Showing posts with label Seche Vite. Show all posts

Tuesday, December 10, 2013

Hey...hey...HEY! Late Movember post!

Hi Lovelies! Hell, it's been a heck of a time the past week and a half! While I was busy with my Movember saga (yes, that's the last time I posted. I'm sorry!) I decided to go apply for my Learners Licence because I need to be more mobile. Made my appointment on the 28th of November for the 3rd December not realizing the 3rd is actually the next week and I was going away over the weekend! That gave me two days to study! *facepalm* So all nail art plans went out the window and I crammed like I last did when I was writing my matric exams! But I passed! Whoooo! Now just got to actually start learning how to drive but that will happen in January when my driving school has openings again. The rest of last week though I just took things a bit slowly and did a crap load of swatching and a few art pieces. It was actually quite nice! But now I'm back and I am ready for December!

The nail art I have on today is actually one of the pieces that I had ready for the Movember Saga and yes, I know November is finished but I still wanted to post this mani. Played around with a bit of color and came up with this retro-ish Movember mani.


I started by laying down 2 coats of Sinful Colors Snow Me White on all my nails. I then went in with a striping brush and added vertical lines across my middle and ring finger using Tip Top Nail Chic Solar Flare (orange), Tip Top Nail Chic Jazzberry Blue (blue), Tip Top Nail Chic Sexy Bikini (pink), Tip Top Nail Chic We Have An Agreen Mint (green) and China Glaze Are you Jelly? (purple). On my pinky, index finger and thumb I made a line of dots using the same colors as mentioned above, verticaly up the nail.


To finish up the mani I added a classic moustache to my middle fnger and a handle bars moustache (also known as a 70's mo) to my ring finger.


I liked how the mani came out! For some reason I really REALLY struggled with the moustaches and had to do so many touch ups in between with the different colors but eventually I was happy with it! I just added a thick layer of Seche Vite over it and it smoothed out any bumps beautifully!

If you would like me to swatch any of the colors you saw in today’s post, please let me know via email or drop me a comment below. More than willing to oblige! 

Lots of mad love...


Friday, July 19, 2013

Pink and Black Skittle Mani

Hi there lovelies! Yay for Friday hey!

Most nail polish and nail art blogs are featuring beautiful mint mani's today in remembrance of Talia Joy. I'm really hoping I can join in this great effort to bring honor to someone who was already at such a young age an inspiration to so many people! Fingers crossed!

Onto today's post...

Skittle mani's. They look and are so easy to do! They are fun, adventurous and quite cute looking! The perfect excuse for any nail artist who wants to try a whole bunch of different designs but doesn't have the patience time to do all of them separately! I adore them...except on me! For some reason they never look right when I do them! It's like I never really choose the right type of patterns to go together. It's weird. But in the spirit of learning and growing together, I have decided to post my attempt that I tried a few weeks ago anyway.

Nail Polishes Used:
  • China Glaze Make and Entrance
  • China Glaze White on White
  • WOW Nail Polish 393

Tools Used:
  • Dotting tool
  • Wide fan brush

Other:
  • Bundle Monster plate BM222
  • Rhinestones
  • Loose small hex glitters


On my index finger, pinky and thumb I layed down a basecoat of WOW 393. On the thumb I made random polka dots with the dotting tool using China Glaze Make an Entrance. On my index layed down a thin layer of top coat and put on a few rows of small hex glitters in silver. And on my pinky I used this tutorial from my friend V's blog (For The Love of Nail Art) and made a few swipes with China Glaze White on White and then a few swipes with China Glaze Make an Entrance over the white.


For my middle and ring finger I layed down a basecoat of China Glaze Make an Entrance
Then my middle finger I stamped on the butterfly design (tramp stamp on my finger yo!) using Bundle Monster plate BM222, layed down a thin coat layer of top coat and placed small black hex glitters around the butterfly. On my ring finger I kept it “simple” and stuck on 2 black rhinestones. I topped everything off with a coat of Seche Vite. Besides it being an awesome top coat, it also helps keep the rhinestones in place!


Overall it's not a bad skittle mani! I just didn't...”feel it”, if that makes sense. But hey, that only means I get to work on this type of nail art some more till I'm eventually happy with it! And that's a WIN in my books! ...Also, and purely by coincidence, my friend M from Ordinary Misfit also did an pink and black skittle mani this week on her blog! Go lookie!

If you would like me to swatch any of the colours you saw in today’s post, please let me know via email or drop me a comment below. More than willing to oblige!


Lots of mad love


Wednesday, July 10, 2013

First NAIL ART post! Featuring screams from the past and marbles!

Well hello there you beautiful bunch! 2 posts in one day?? Aren't you lucky!

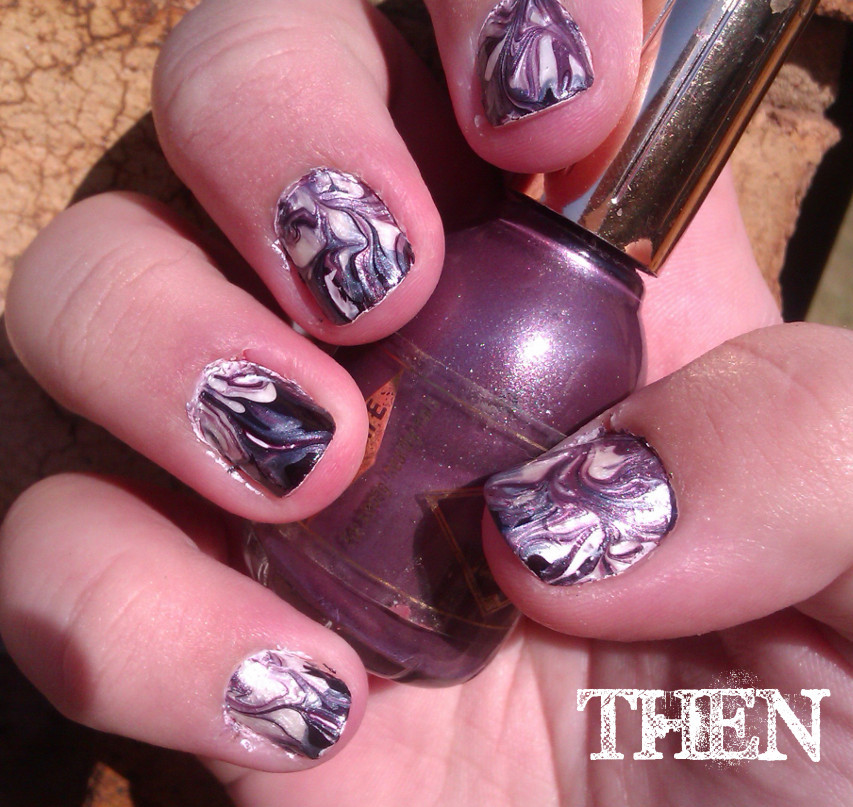
For my first official nail art post I decided to take a bit of a trip down memory lane by doing a “Then and Now” type of post with the very first proper nail art I ever tried. And by proper I mean PROPER! I've dabbled in stickers and rhinestones in my high school years but this was my first full on “balls to the wall” type of nail art. And I was quite proud of myself back then.

When I discovered nail art about a year ago, one of the first techniques I saw was dry marbling/needle marbling and I loved the look! It wasn't too hard to do and was way less messy than water marbling. So using this tutorial from Nail Nerd I jumped right at it and gave it beans!


Like I said, I was quite proud of the results back then but looking back at the photos now I can see a big improvement. On to the “Now”...


Not only is my clean up job better but the general state of my hands just looks healthier! It shows that a bit of moisturizing and good cuticle care actually pays off! Also, I have definitely improved on my ability to file my nails in a semi-decent shape! Not there 100% but I'm getting there.


Nail Polishes used:
  • Sinful Colors Snow me white
  • Tip Top Nail Chic Purple Reign
  • China Glaze Spontaneous

Tools Used:
  • Small tipped dotting tool
  • Plastic freezer bag
  • Tweezers

Unfortunately I have no idea what the exact polishes was that I used a year ago.


I started by laying down the 3 colours next to each other quite thick on a plastic freezer bag. Then with a small ended dotting tool I went in and made random swirls. The bigger the dotting tool end, the thicker your swirls will be. Once this was properly dry (I usually wait a day) I lifted it off the baggie with the tweezers and cut it down into smaller individual pieces so it was easier to place on the nails. On my nails I put on a base of Sinful Colors Snow me white. When this was dry I laid down a thin coat of topcoat, waited till it felt almost tacky and then laid down the marbled pieces on my nails as shown in this tutorial. I finished off the mani with Seche Vite, cleaned up my edges with a pointed q-tip, a small paint brush and some acetone and BOBS YOUR UNCLE!


Moral of the story: If you're a blogger and are feeling down in the dumps, look back at your work from a year or more ago and then look back at your current work. I guarantee you there will be a huge improvement and you will feel AMAZEBALLS!

I hope you enjoyed my first official nail art post with me and that you will stick around for the many more to come in the future!

Lots of mad love!