Tuesday, October 29, 2013

Jack-O-Lantern Water Marble

Hi lovelies. Happy Tuesday! It feels so fresh and clean here in Pretoria because we had some lovely rain last night. Going to enjoy it while it lasts and before my skin goes “Hey! Lookie! Dust! And hey! Lookie again! A hive! Or five!”. Fun times people! Fun times!

Little bit of side news. I did a guest post and a Q&A for the lovely Heather from Femme Lifestyle a few weeks ago. My first ever tutorial people! Scary stuff! But maybe worth a look? Feel free to go check it out:

Today's mani was inspired by the current festivities in the air and the fact that every time I try a water marble mani, I have to try it again. I love the technique! It's a pain in the butt to do but the results are worth it!

Nail Polishes used:
  • Tip Top Nail Chic Solar Flare
  • WOW Nail Polish #393

Tools Used:
  • Thin nail art brush


For my base I layed down 1 coat of Tip Top Nail Chic Solar Flare. I used WOW Nail Polish #393 and  Tip Top Nail Chic Solar Flare to make the water marble on all my nails except for my middle finger. On that I added another coat of  Tip Top Nail Chic Solar Flare and with the thin nail art brush and WOW Nail Polish #393 made my Jack-O-Lantern face.


In general, I really like how this came out...except for the stained cuticles. Orange and acetone are not friends people! They will team up and turn against you. Luckily it didn't bother me too much and I always enjoy playing around with the marbling! Worth the stains! 

If you would like me to swatch any of the colours you saw in today’s post, please let me know via email or drop me a comment below. More than willing to oblige!

Lots of mad love...


Friday, October 25, 2013

#MTV Challenge: 10. Gradient & Watermarble

Lovelies! What is that ridiculously silly smile I see there on your face? It's because it's Friday, isn't it! You have my full permission to spazz out when you're done at work!
So there is a huge possibility that some sort of phenomena is going to take place today because I am finally done with the MTV Challenge! Nope, I kid you not! If you see a unicorn today or my relationship status on Facebook says “Married to David Tennant”, you know why!...Oh please, oh please say it's the David Tennant one! Hmmmmmm...


Anyhoo...


10. Gradient & Watermarble


Nail Polishes used:
  • WOW Nail Polish #393
  • Sinful Colors Snow Me White
  • Wet n Wild Buffy The Violet Slayer
  • Nubar Palau Coral
  • Essence Top Coat

Tools/Other Used:

  • Dotting Tools
  • Make-up sponge
  • Thin small nail art brush


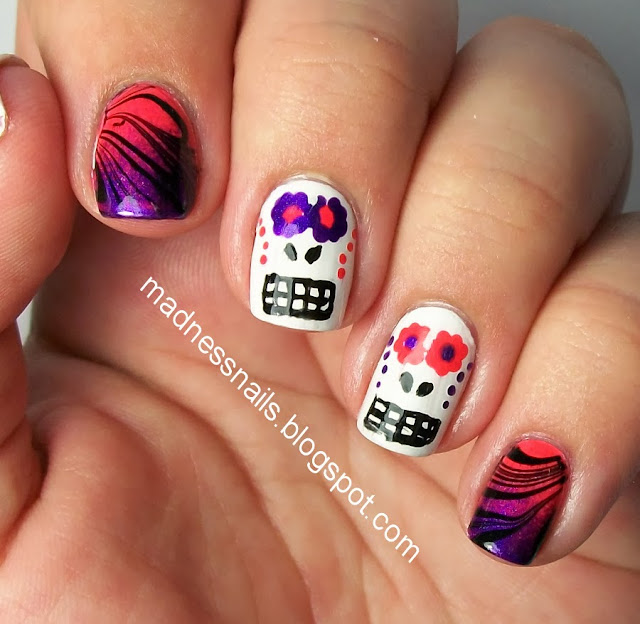
I started out by laying 2 coats of Sinful Colors Snow Me White on all my nails. With a make up sponge, I then made a gradient on my pinky and index finger using Nubar Palau Coral and Wet n Wild Buffy Violet Slayer. When this was dry, I made a watermarble using Essence Top Coat and WOW Nail Polish #393.


On my ring and middle finger I used the thin nail art brush and dotting tool to make sugar-esque skulls. Finally on my thumb, I used a large dotting tool to create a few random flowers and just added a few smaller dots in between to full up the space a bit more.


Overall, I really like this mani! The execution could have been a little bit neater but I only realized the major flaws when I was cropping the photos. The colours I love together though! I'm wearing Nubar Palau Coral on my toes at the moment and man, I dig it! Another one to go on to my “To Swatch” list...with Wet n Wild Buffy The Violet Slayer because she is a stunner!
I just want to say a huge THANK YOU to my awesome friends For The Love Of Nail Art and Ordinary Misfit! Loved doing this challenge with you ladies and can't wait to do the next one with you! You ladies absolutely killed it! Also thank you to Polished Tickles & Beauty, Mama Zombie Mumbles and Passion For Polish for joining us along the way. You all did amazing work! So same time, same place next year? ;D


If you would like me to swatch any of the colours you saw in today’s post, please let me know via email or drop me a comment below. More than willing to oblige!


Lots of mad love...


Wednesday, October 23, 2013

#MTV Challenge: 9. Rainbow & Galaxies

Are you one of those people that understands meme's but when someone asks you what a meme is, you can not explain it no matter how hard you try? Can you spend hours of your day on a site like 9GAG or Reddit and frankly not give a damn that those hours are gone...FOREVER? If I say “I used to have a life until I took an arrow to the knee”, would you respond with “Cool story bro”? Then this mani is for you!

9. Rainbow and Galaxies


So I am finally on the second last mani for the #MTVnailChallenge and when I saw this theme I almost immediately knew what I wanted do! I've been wanting to do a similar mani to this for quite a while now so this theme just helped me to finally put my head to it and take it on! I give you...Nyan Cat!


Because there are so many different steps to this mani I'm not going to lay them out step by step like I usually do but I will list the different polishes and tools that I used in the order that I did in this mani.


Galaxy:

  • China Glaze Man Hunt
  • China Glaze Grape Pop
  • China Glaze Spontaneous
  • Tip Top Nail Chic Cha Cha Cha
  • Essence Twins Reloaded Edward
  • Sinful Colors Snow Me White
  •  WOW Nail Polish #393
  • Small torn-off pieces of a make-up sponge


Nyan Cat:
  • Essence Nude Glam Cafe Ole
  • Avon Pastel Pink
  • China Glaze Recycle
  • OPI If You Moust You Moust
  • Tip Top Nail Chic Grape To Meet You
  • Sinful Colors Snow Me White
  • WOW Nail Polish #393
  • Thin nail art brush
  • Thin cut down striping brush

I used the decal-method to make Nyan Cat on a plastic baggie before hand.


Rainbow:

  • Tip Top Nail Chic We Have An Agreen Mint
  • Tip Top Nail Chic Jazz Berryblue
  • Tip Top Nail Chic Solar Flare
  • Tip Top Nail Chic Sun Kissed
  • Nubar Competition Red
  • Thin nail art brush


I am genuinely happy with how this came out and was very proud of myself! It was hard work but the end result to me, made it worth it. Is it perfect? No! But I aint even mad! True story bro! Now if you're looking for me, I'm off to go laugh at some pointless cat videos on Youtube.

If you would like me to swatch any of the colours you saw in today’s post, please let me know via email or drop me a comment below. More than willing to oblige!

Lots of mad love...


Friday, October 18, 2013

Vintage Roses Out Of The Vault!

Hi there lovelies! I hope everybody is doing great! It's Friday, which for some weird reason puts most people in a strangely good mood! Wonder what it might be...oh yeah, IT'S THE WEEKEND BABY! Like always I am going to probably do my nails, eat a crap load of junk food, rot in front of my Xbox and probably catch a swim. Living on the edge people! Hardcore to the max!
So I know I am behind in the MTV Challenge but I really felt like posting today and since I'm still busy with my galaxy rainbow post, I decided to go dig in my photos to see what other pretties I can spam you guys with. I actually can't believe I haven't posted these yet because I did them for the Tip Top South Africa Nail Concept around the end of September. Weird...but anyhoo, I give you Vintage Flowers!


Nail Polishes used:
  • Tip Top Nail Chic Black Forest
  • Tip Top Nail Chic We Have An Agreen Mint
  • Tip Top Nail Chic Ripped Me Red
  • Tip Top Nail Chic Red Rendezvous
  • Tip Top French Manicure White

Tools Used:

  • Small thin nail art brush
  • Striping Tape
  • Dotting Tool


I started by laying down 2 thick coats of Tip Top French Manicure White. When this was dry, I placed some striping tape down very carefully using a tweezer and then painted a thick coat of Tip Top Nail Chic Black Forest over the tape, pulling the tape off immediately after I painted the coat on.


For the roses I added random blotches using the dotting tool and Tip Top Nail Chic Ripped Me Red. I then went in with Tip Top Nail Chic Red Rendezvous and my trusty nail art brush (which is actually just a fancy way to describe a really cheap liquid eyeliner brush) and made the random “C” shapes to give the flowers some detail. To finish the look off, I added a few leaves using Tip Top Nail Chic We Have An Agreen Mint and the once again, my thin nail art brush. 


Is it vain to love something you did yourself because I adore how this came out and am quite proud of myself. I love the flowers over the black and white background. Can I do the same art twice because I really want to wear these again!...Now who has something fancy going on so I can wear these and flash my fingers around all nonchalantly! Classy!

If you would like me to swatch any of the colours you saw in today’s post, please let me know via email or drop me a comment below. More than willing to oblige!

Lots of mad love...


Thursday, October 17, 2013

#MTV Challenge: 8. Metalllic & Halfmoons

Hi there lovelies! So before I get into today's nails, I have got a bit of awesome news to share with my South African ladies. I'm sure most of you know this already but Wet n Wild Cosmetics are busy launching in selected Clicks stores throughout South Africa! They plan to have all their displays set up by end November 2013 but there are a few stores that have the displays up and running already and for once, a Clicks close to me actually has a completed set-up and I was able to scoop a few new babies! Yay Kolonnade! Their prices are also really reasonable, ranging from R24.95 – R49.95 for their nail polish. Unfortunately I didn't really concentrate on their other cosmetics but they have a little bit of everything! For more information regarding Wet n Wild's products and at which stores they will be available, feel free to swing by their Facebook Page.


On to the topic at hand though!

8. Metallic & Half Moons

I don't own many metallic polishes so this topic wasn't as hard for me as the other topics when it came to choosing a polish and since I have gotten this little purple beauty, I have been dying to use her!

Nail Polishes used:

  • WOW Nail Polish #393
  • Nubar Erratic Purple

Tools/Other Used:
  • Bundle Monster plate BM-321
  • Ring-binder reinforcement stickers


I started out by laying down 2 coats of WOW Nail Polish #393 on all my fingers, except for my ring finger. When this was completely dry, I placed the Ring-binder reinforcement stickers on the lower part of my nail and stamped with Bundle Monster plate BM-321 and Nubar Erratic Purple over the open section, pulling the stickers off immediately after I stamped on the nail. On the ring finger I did the exact same but just had Nubar Erratic Purple as my base color and stamped over the nail using WOW Nail Polish #393.


I wasn't 100% happy with the outcome but that was because I felt my half moons went up a bit too high. Next time I'll definitely place the ring-binder reinforcement stickers a bit lower on the nail to create a smaller half moon. Nubar Erratic Purple is stunning though and stamps beautifully! Already did another stamping mani with her and was freaking ecstatic with the outcome. But will show you that another time ;D

Although most of these ladies are already finished with the challenge, please go check out their awesome hard work:

Ordinary Misfit

For The Love Of Nail Art

Polished Tickles and Beauty

Passion For Polish

If you would like me to swatch any of the colours you saw in today’s post, please let me know via email or drop me a comment below. More than willing to oblige!

Lots of mad love...


Friday, October 11, 2013

#MTV Challenge: 7. Black, White and Glitter

Hi lovelies! Hope everybody is well! Heck, this week flew by didn't it? I wanted to do so many things but got to absolutely none of them! But that's mainly because I am a huge procrastinator and I've been feeling a bit down in the dumps also, but will tell you all about that some other time.

Now nails!

7. Black, White and Glitter

This theme in the challenge kind of bummed me out because I have been wanting a black and white glitter for the longest time now but luckily the theme wasn't “Black and White glitter”, so I made it work for me.

Nail Polishes used:

  • WOW Nail Polish #393
  • Sinful Colors Snow Me White 
  • China Glaze Ruby Pumps

Tools/Other Used:

  • Sticky Tape
  • Zig Zag Crafting Scissors


I layed down 2 coats of China Glaze Ruby Pumps as my base. When this was dry, I put down the strip of sticky tape that I cut with the craft scissors,  horizontally on the nail. I then put on a coat of Sinful Colors Snow Me White on the open section and pulled the sticky tape off immediately. After the white tips were properly dry (emphasis on PROPERLY DRY), I repeated the process with the sticky tape but with WOW Nail Polish #393.


I don't know why but this kind of reminds me of a circus. I think it's the colors. And my wobbly looking zig zags! On the other hand, China Glaze Ruby Pumps is a stunner. I really need to play with my reds a bit more. It's a really underrated color which I absolutely love every time I actually wear it!

Now go check out the other gorgeous creations by the other ladies! Like always, it's pretty killer:


If you would like me to swatch any of the colours you saw in today’s post, please let me know via email or drop me a comment below. More than willing to oblige!

Lots of mad love...


Monday, October 7, 2013

#MTV Challenge: 6. Violet & Tribal

Lovelies! Hi! I honestly don't have a lot to say today.  I'm in one of those really...meh moods. Hate it! I swear, you could be throwing peanuts at my head at the moment and I would not give a damn! Nope! But it has been a beautiful day here in Pretoria so I guess I can't complain right? Chin up big girl! You have access to the internet and unlimited pictures of Ryan Gosling!


Source


6. Violet and Tribal

Today I am posting my take on this theme. I am still hella behind but hopefully by the end of this week I will be finished. I am so excited to see the other ladies takes on the last two topics though!

Nail Polishes used:
  • WOW Nail Polish #393
  • Tip Top Nail Chic Grape To Meet You
  • China Glaze Flyin' High

Tools/Other Used:
  • Striping tape
  • Thin nail art brush
  • Dotting Tool


I started out by laying down 2 coats of China Glaze Flyin' High. When this was dry I layed down striping tape horizontally to make random sections on my nails and filled in a few of the spaces with Tip Top Nail Chic Grape To Meet You. I then went in with my thin nail art brush, dotting tool and WOW Nail Polish #393 and made random stripes and dots for the tribal patterns.


I'll be honest, even though I got quite a few compliments on these nails I didn't like them that much. I think my free handing striping skills threw me off. Practise time it is then! Pshh, like I ever complained about a reason for me to do more nail art!

Remember to go take a looksie over at my fellow challenge lovelies blogs:

Ordinary Misfit

For The Love Of Nail Art

Polished Tickles and Beauty

Passion For Polish

Mama Zombie Mumbles

If you would like me to swatch any of the colours you saw in today’s post, please let me know via email or drop me a comment below. More than willing to oblige!

Lots of mad love...


Thursday, October 3, 2013

#MTV Challenge: 5. Blue and Delicate Print...I'm back!

Hi there lovelies! Before I say or do anything, let me first start off by saying I am so so sorry for my absence and lack of posting the past week and a half! My grandad passed away last week Monday and I decided I was just going to take a few days away from the blog because things can tend to get hectic with arrangements and other stuff. I also then spend a few days this week with my family after the memorial service. Michelle from Ordinary Misfit and Voni from For The Love Of Nail Art were absolute rockstars about the situation and said I could just catch up with the challenge when I get a chance! These ladies are awesome!

Now, time to catch up...

5. Blue and Delicate Print

I was so ridiculously blessed on my birthday with AMAZING spoils from my friend, Ordinary Misfit and two of the polishes I got from her was my 1st ever ZOYA! Yes, there might have been some squealing and clapping like a spastic seal involved when I opened my package but it was awesome! And this also sent my whole initial idea for this topic down the drain because I absolutely needed to use one of my new babies!

Nail Polishes used:
  • Sinful Colors Snow Me White
  • Zoya Song

Tools/Other Used:
  • Konad M73
  • Striping Tape

EEEK! Stained cuticles!


This mani was pretty straight forward. For my base I layed down 2 coats of Sinful Colors Snow Me White. Once this was dry, I placed the striping tape verticaly on a small section of my nail and filled it in with one coat of Zoya Song. To finish off the look, I stamped the flower pattern from Konad Plate M73 on to the open white section of the nail.


I adore Zoya Song! Adore, adore, ADORE! I need to swatch this color because my photos does not do this color justice even slightly! It's just...perfection! Thank you so much M! I might just be in love...with Zoya Song that is!

My fellow lovely ladies are quite a bit ahead of me in the challenge at the moment but go check them out to see what lacquered adventures they have been up to! Gorgeousness all the way!


If you would like me to swatch any of the colours you saw in today’s post, please let me know via email or drop me a comment below. More than willing to oblige!

Lots of mad love...